April brings perfect kite-flying weather. Start now, and your creation can appear at the ABC Kite Fest at Zilker Park on April 11. Here is how to get started:
Step 1: Gather Your Materials
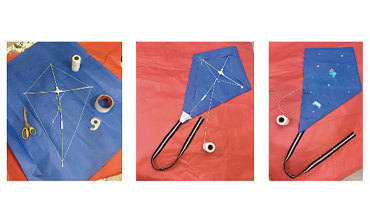
You’ll need:
- Two lightweight sticks, about 20 and 24 inches, or substitutes such as drinking straws taped together, bamboo skewers, garden stakes, or straightened wire hangers
- String or twine
- A sheet of sturdy paper, craft paper, or light plastic
- Scissors, tape, and a ruler
- Markers, paint, tissue paper, or stickers
- Ribbon or fabric strips for the tail
Step 2: Build the Frame
Lay the shorter stick across the longer one to form a cross, positioning it about one-third down from the top. Tie them tightly with string and trim any excess. Add a dab of glue for extra reinforcement. Then wrap string around the four ends of the sticks to form the kite’s outline, or “skeleton.”
Step 3: Add the Sail
Place your paper or plastic under the frame and cut around the shape, leaving an extra inch. Fold the edges over the string outline and tape securely. Poke a small hole where the sticks meet and tie on your flying string with a sturdy knot.
Step 4: Create the Tail
Attach a long ribbon or fabric strip to the bottom of the kite to keep it stable in the air. Adjust the length based on kite size, and add bows or knots for decoration and weight distribution.
Step 5: Decorate Your Kite
Let creativity take flight. Bright colors, patterns, drawings, and stickers help your kite stand out against the sky, and this step is perfect for kids who want to personalize their design.
Step 6: Head Outside and Fly
Choose a wide, open field away from trees and power lines. Face the wind, hold your kite high, and start running. Once the breeze catches the sail, your kite will lift. If needed, have a helper give it a gentle upward launch.
Join the fun at the ABC Kite Fest on April 11, where the Greater Austin YMCA will offer family kite-building activities and share information about youth programs. Learn more at www.austinymca.org.