



Turn an ordinary paper plate into an adorable snowy owl with wings that flap. This fun craft combines creativity and simple mechanics for a feathered friend that really moves.
What You’ll Need: A paper plate, pencil, ruler, scissors, hole punch, paper clips, brads, and art supplies to decorate your owl.
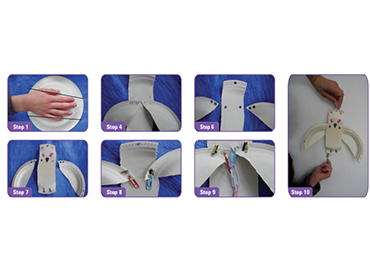
- Place your hand in the center of the plate and trace two lines along its edges to divide the plate into three pieces. Cut along the lines. The middle piece is the owl’s body, and the two rounded pieces are its wings.
- On the body, mark an X about one-third of the way along each side. Position the wings just below these marks, with their tips nearly touching the body. Mark Xs on the wings where they meet the body, then add another X near each wingtip.
- Mark an X in the middle of the body’s rim at the top of the owl’s head.
- Ask an adult to punch holes at all seven Xs, shown in step 5 image leaving enough space around each hole to prevent tearing.
- Decorate your owl before assembling it. The convex side of the body is the front.
- Use brads to attach the wings to the body. Connect paper clips at the wingtip holes to form a pull-string chain, and add a paper clip to the top of the owl’s head.
- Hold the owl by the top paper clip and gently pull the chain. Watch those wings flap!
Mad Science of Austin is a leading science enrichment provider, delivering unique, hands-on science experiences for kids through after-school programs, birthday parties, special events, and camps.