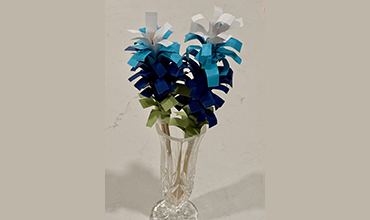
Make bluebonnets that will bloom long after the real flowers have given way to summertime heat.
MATERIALS NEEDED:
- Four sheets of colorful paper – one dark blue, one light blue, one white (for the bluebonnet petals), and one green (for the leaves)
- Wooden skewer (slightly skinnier than a pencil)
- Scissors
- Pencil
- Ruler
- Tape
Step One: Measure strips on each piece of paper, 2 inches wide by 11 inches long.
Step Two: Cut the paper into strips along the lines you’ve drawn.
Step Three: Make a quarter-inch fold on each strip along one of the long sides
Step Four: On the other long side, cut tiny sections toward the folded piece about a quarter inch apart. These don’t need to be exact. Different widths give your bluebonnet a more natural appearance.
Step Five: Cut the strips of paper to desired lengths. This will determine how many layers of petals you have: the longer the strip, the more layers. In this example, the dark blue strip is 11 inches. The light blue strip is about 4 inches long. The white strip is about 2 inches long.
Step Six: Align each strip on a wooden skewer and roll the strip toward the fold line. You can also do this with the green paper for tiny leaves.
Step Seven: Attach the curled pieces of paper by flattening the folded edge and taping one end to the skewer. Begin wrapping around with paper around and down the skewer with the curls facing outward and down. Attach the white first then light blue and dark blue last.
Step Eight: Using the same technique, attach the leaves at the bottom of the skewer.
Age-appropriate themed arts and crafts projects are a regular part of the curriculum at The Greater Austin YMCA Summer Day Camp. Registration is open now for camps at 20 area locations. Learn more at
www.austinymca.org/camp/summer-day.


